How To Shrink Hyper-v Virtual Disk And Reduce Size of Hyper-v VHD File?
Hyper-V is previously known as Windows Server Virtualization and it is able to create virtual machines on x86-64 systems running Windows. Working with Hyper-V dynamically expanding disks is always a risk because disk grows in an uncontrolled way and in a few times reaches the maximum size. To handle this issue you can examine disk size changes on a regular basis and can reconfigure the virtual hard disk properties manually. To ensure impressive storage space allocation, user can compact or shrink virtual hard disks. In this blog, we will know how to compact and shrink Hyper-V Virtual Disk. Follow to the end.
What is Hyper-V Dynamically Expanding Disks?
Hyper-V dynamically expanding disks allow you to use physical storage space effectively. Primarily, users create dynamically expanding disks it is small in size but as well as new data is added it reaches the maximum size, thus allowing you to minimize storage costs. It works well in the development and testing environment and very much compatible with servers running non-disk intensive applications.
Understanding Shrinking vs. Compacting Virtual Hard Disks
In Hyper-V, it’s essential to distinguish between ‘shrinking’ and ‘compacting’ a virtual hard disk (VHD):
- Shrinking: This process reduces the maximum storage capacity allocated to a VHD. Essentially, it decreases the disk’s size limit, allowing the user to reclaim unallocated space within the virtual disk.
- Compacting: Compacting focuses on reducing the actual file size of a dynamically expanding VHD by removing unused space. This operation reclaims physical storage on the host system without altering the VHD’s maximum storage capacity.
Now in the next part, we will know the methods to shrink and compact Hyper-V virtual disk.
Note: Before shrinking the hyper v shrink disk or compacting the hyper v compact disk, it is suggested that please empty the Recycle Bin, defragment the disk, and then create its backup to protect critical data in case of disk failure. Remember that the VM using the disk needs to be turned off for the compact operation to work.
How to Shrink Hyper-V Virtual Disk?
Mainly three types of virtual hard disk – fixed, differencing and dynamically expanding. They have the fix upper size limit which can be reduced by the shrink method. Follow the below steps to shrink the virtual hard disk:
- Open Hyper-V Manager and connect >> login to the Virtual Machine.
- After that, launch the Disk Management tool and to launch this tool type MSC in the search bar.
- Right-click the disk volume that you want to shrink, and select the Shrink Volume option from the drop-down menu.
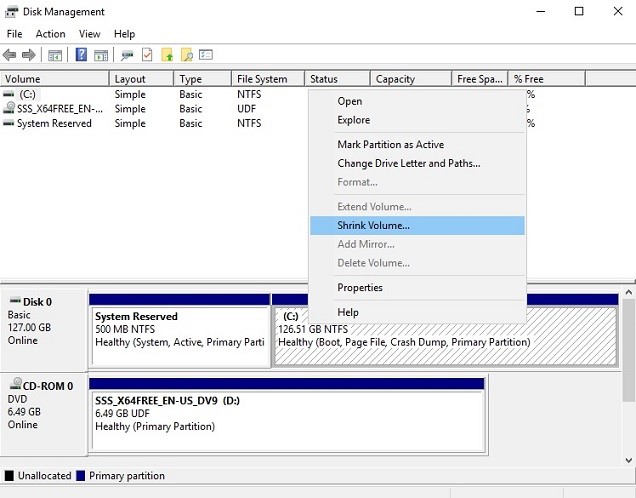
- Now enter the amount of space you wish to shrink in MB. Click Shrink.
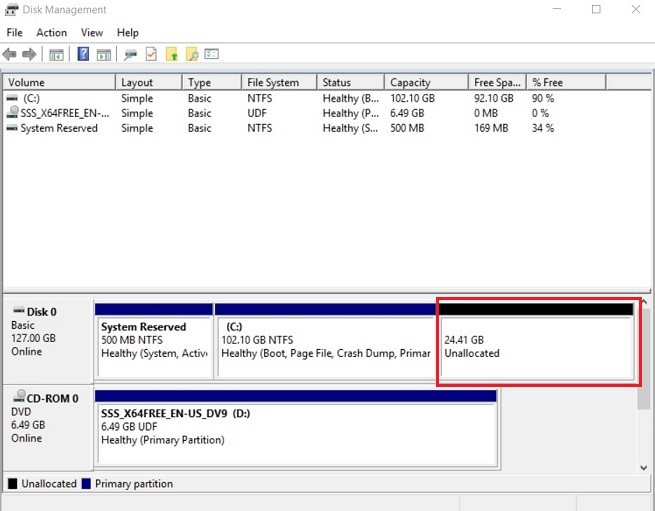
- After shrinking, as a result, you will have roughly 25 GB of unallocated disk space.
- Finally, shut down the Virtual Machine and again open it, and again in Hyper-V Manager, right-click the VM and select Settings.
- In the Hardware section, click Hard Drive to get access to the virtual hard disk settings.
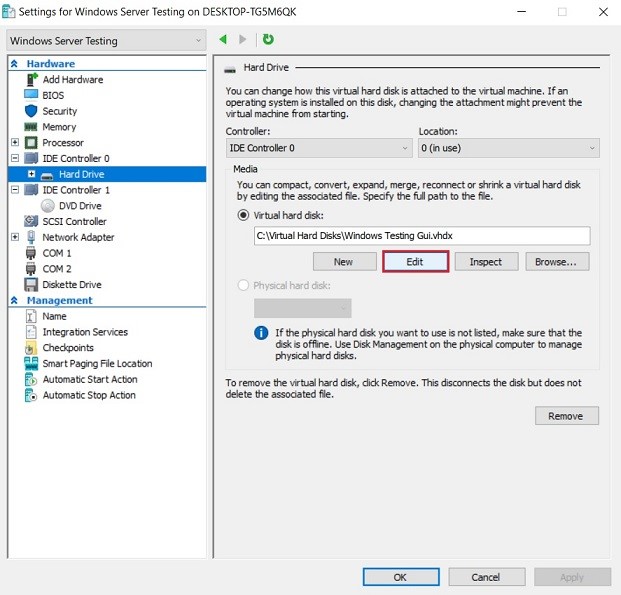
- Choose Edit to open the Edit Virtual Hard Disk Wizard. Skip the Locate Disk step if already selected which disk you would like to shrink. Click Next.
- Select Shrink in the Choose Action section and click Next.
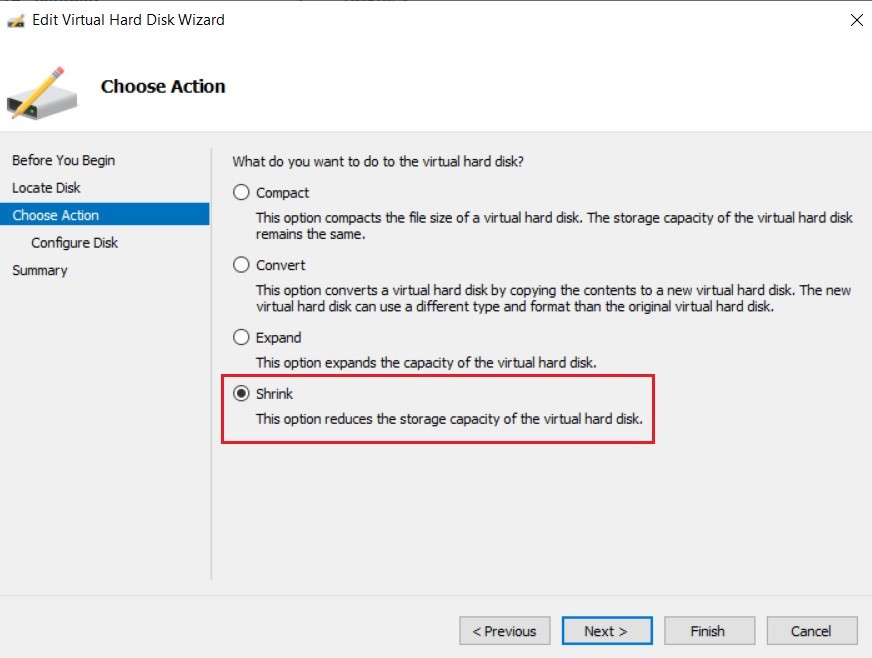
- The next step is to configure the new size of the virtual hard disk.
Now you will see the difference between the current disk size and the minimum size is equal to the amount of extra disk space which was previously created inside the VM.
- Here you can look at the changes that you are about to implement, in the Summary section. Click Finish to complete the action and close the wizard.
- Click Inspect to verify that the disk size has actually changed and you have successfully shrunk the virtual hard disk.
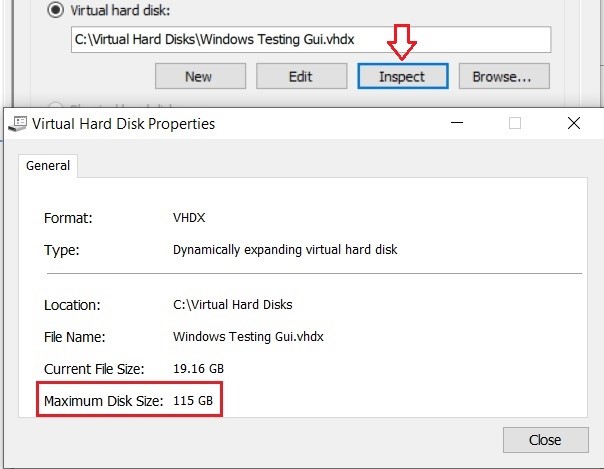
Finally, the maximum disk size has successfully reduces to 115 GB.
How to Compact Hyper-V Virtual Disk?
Hyper v shrink disk doesn’t reduce the storage capacity only reduces the file size of the virtual hard disk by removing empty blocks from the file. Now to compact hyper v virtual disk follow the steps below
- Login and open Hyper-V Manager. Right-click the Virtual Machine (VM) and select Settings.
- Click Hard Drive to get access to the virtual hard disk attached to this VM. Then click Edit to launch the Edit Virtual Hard Disk Wizard.
- Skip the Locate Disk step if already selected which disk you would like to shrink. Click Next.
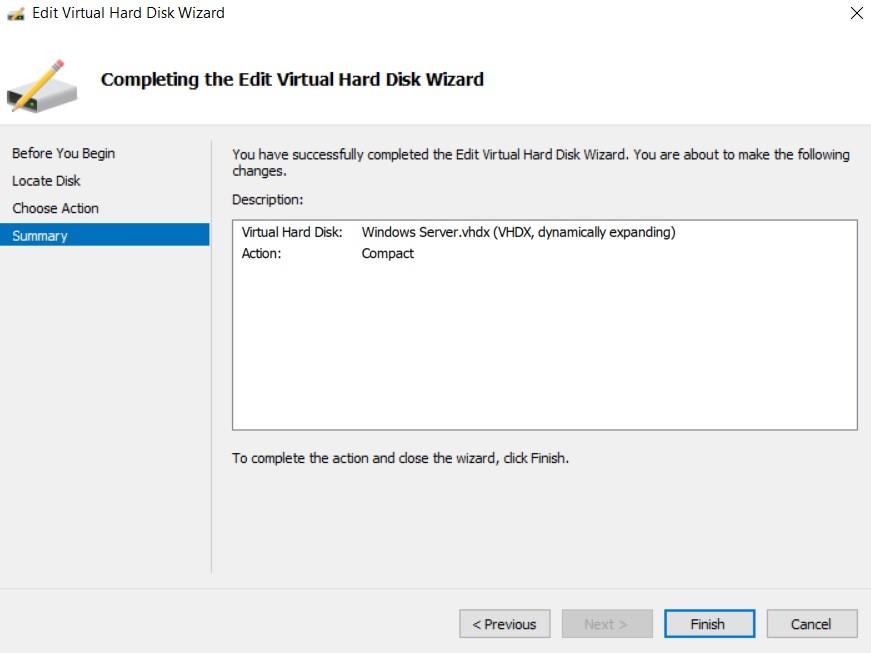
- In the Choose Action select the Compact option.
- Now in the Summary, verify the changes which are made to the virtual hard disk. Click Finish to complete the action and close the wizard.
Conclusion
We have discussed how to compact and shrink Hyper-V virtual disk in detail and also describe the shrinking and compacting method step by step. But it seems like a very complicated and required technical expertise to perform the above methods. So, many times it happens that the Virtual disk data get effect during shrinking or compacting the hyper v virtual disk. So if due to whatever reason you face any issue in the Hyper v VHD file then you can use the VHDX File Recovery tool to repair and recover the corrupt VHD file. It is a high-class vhd restoration software which can easily save the VHD data without any data alteration.