How to Auto-Mount VHD or VHDX File at Startup in Windows 10, 8.1, & 7?
Would you like to know about auto-mount VHD in Windows 10? This is the right place to find all the details about auto-mounting VHD/VHDX drives.
An abstract computer is known as a Virtual Machine. This uses a physical device to extend the computer system’s versatility while still having as many external environment characteristics as possible. Like most hypervisors, Hyper-V uses files to define this abstract computer. Therefore, the objects that abstract a physical machine’s hard drive(s) are merely data. For Hyper-V, these files are always in VHDX format.
About VHD/VHDX
A semi-open file format, VHDX, is an updated version of the VHD format, designed with improved performance and reliability. To avoid confusion with the previous VHD format, “X” refers to the new specification. Microsoft publicly documents the VHD/VHDX format to allow developers to create applications that handle these files. However, Microsoft retains control over the format’s development and specifications.
You can store various types of files, including documents, images, boot files, and full OS installations, using either format (.vhdx or .vhd) for a virtual drive. The key differences between the two formats are that a .vhdx file supports a maximum size of 64 TB, provides better performance, and includes power failure resilience to protect against corruption. In contrast, the older .vhd format supports a maximum size of 2 TB and lacks these advanced features.
Why Windows Auto-mount VHD/VHDX?
For Windows 10 (as well as Windows 8 and 8.1 and Windows Server 2012 +), you can install a VHDX folder. This allows you to save data from a VHDX file if you have some kind of fatal problem with your original operating system.
Now, let us begin with the auto-mount procedure: You can also read- How to open VMDK in Windows 10
Method 1: Automatically mount VHD in Windows 10 and 8.1 using Computer Management
1. Open the path of the VHD/VHDX file and by the below code, create a text file:
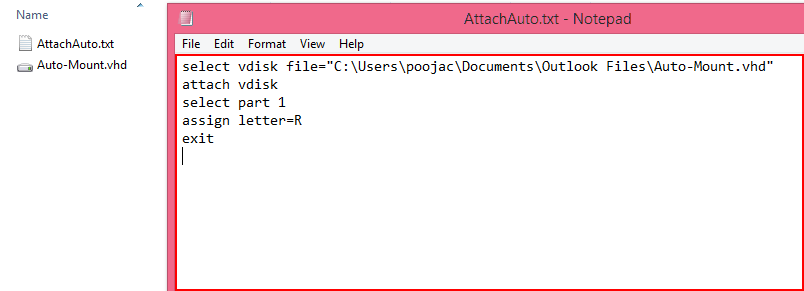
Notice: The script is useful for mounting the VHD / VHDX file, selecting the partition, and assigning a letter to the specified drive.
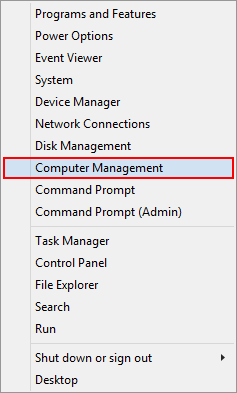
2. Hit on the Windows + X keys and choose Computer Management.
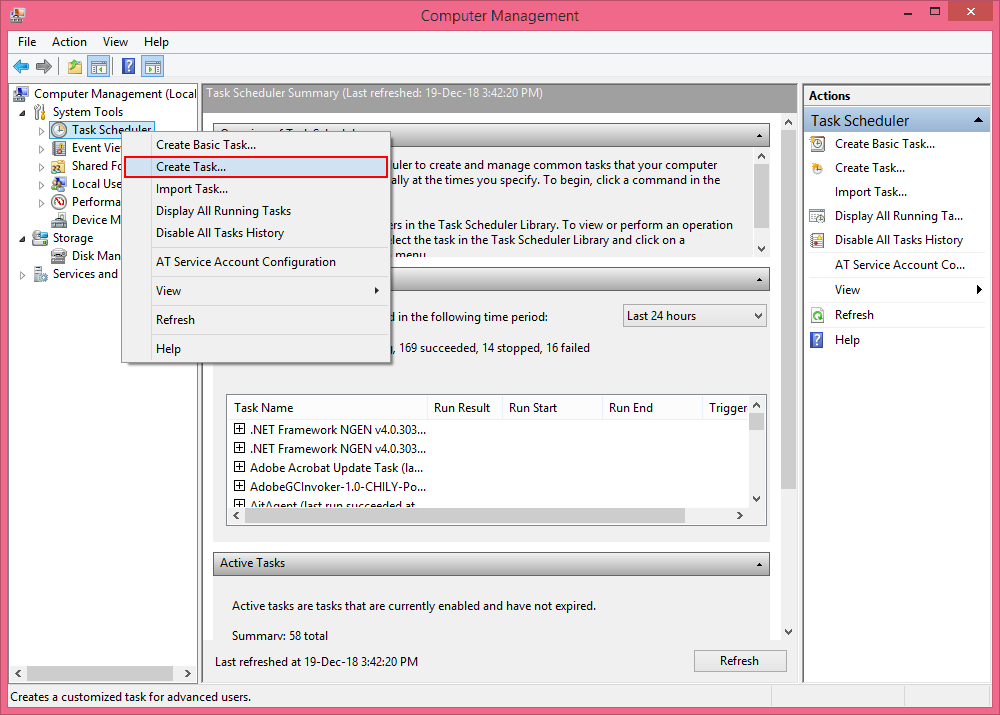
3. Right-click on Task Scheduler under System Tools, and choose Create Task
OR
Under Actions Choose, create a Task from the right panel.
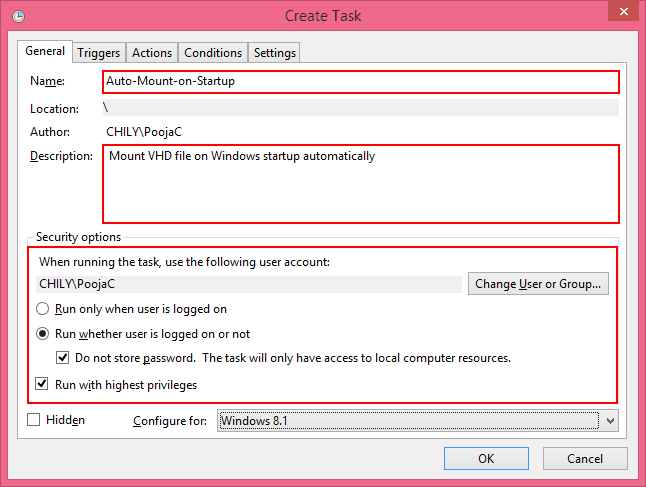
4. Do the following in the Create Task window:
Within the General tab:
- Type the task’s Name.
- In the description
box, type about the task in detail. - Next, choose “Run
whether the user is logged on or not” and also “Run with the highest
privileges” option.
Within Triggers Tab:
- Choose the New button
to set up a New Trigger. - Next, choose the “At
Startup” in Begin the task box. - Choose “delay the task
for” and set the time according to you, under Advanced Settings.
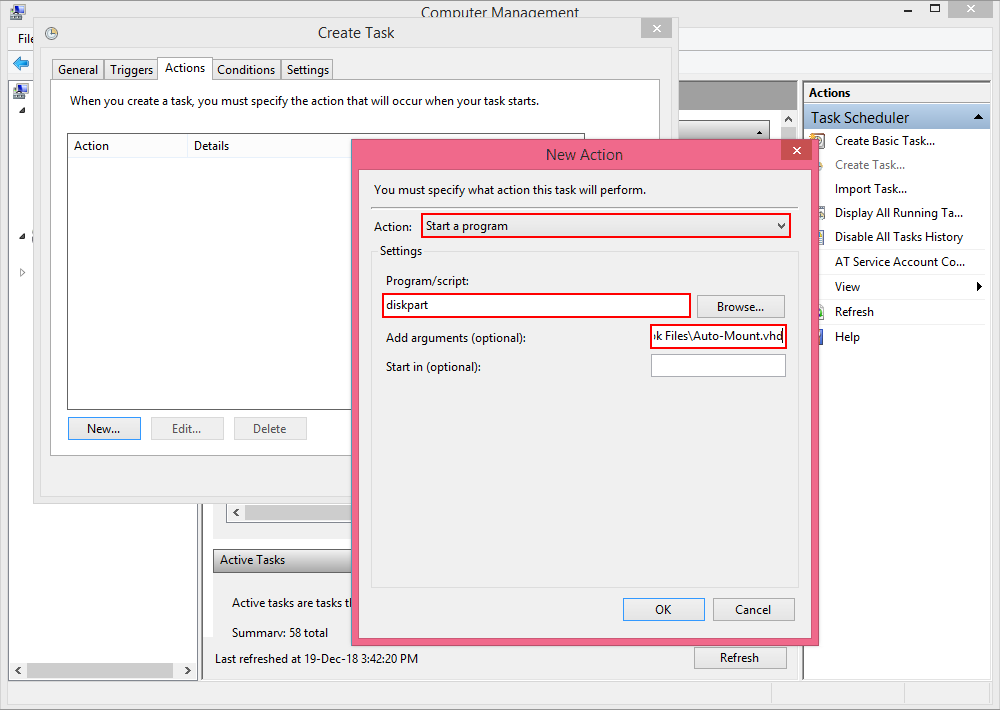
Within Actions Tab:
- By clicking on the New button, create a new action.
- Choose “Start a program” in Action tab then choose the Program/Script and in the Add arguments(optional) enter the following:
/s (followed by space) and write the complete path and name of the script
file (same text file created in step 4).
Within Conditions Tab:
- Do uncheck on the
“Stop if the computer switches to battery power” option. - Again do uncheck on
the “Start the task only if the computer is on AC power” option. - Press on OK to create
the task.
5. Move out from the Computer Management and restart your system to test the auto-mount method.
Method 2: Mount and Unmount(VHD/VHDX) by Command prompt
For all versions of Windows, including Windows 10 / 8 / 7 and Windows Server.
To auto-mount VHD Windows 7 follow the steps below:
Using Command Prompt-
- Initially, in Administrator mode, open the Command Prompt.
- Type diskpart, at the Command Prompt, and click
- Enter to access the command-line disk partitioning utility.
- You need to specify the location of your vhd/vhdx file, before mounting or unmounting the virtual disk. Next, type the following command and press Enter: choose vdisk file=”[location of vhd]”
- Now, you can mount or mount your VHD/VHDX file using the below commands:
Type attach vdisk to mount VHD/VHDX file and hit Enter. In your Disk Management, you can see a new virtual hard drive and Windows Explorer.
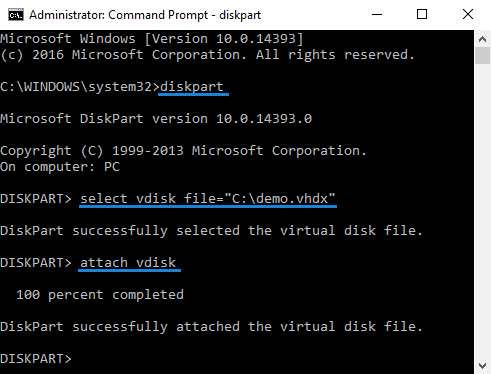
Type detach vdisk, to unmount a virtual hard disk, and hit Enter.
Using PowerShell-
You can also mount and unmount VHD/VHDX files in Windows Server 2016 / 2012 / 2008, using the PowerShell cmdlet:
- As Administrator, open the PowerShell.
- You can run the Mount-VHD cmdlet when the
command-line window opens, to mount your vhd/vhdx file. - Mount-VHD by following Path “[location of
vhd]” - Just run the Dismount-VHD cmdlet to unmount
your virtual hard disk. - Dismount-VHDby following Path “[location
of vhd]” - If an error message such as “Mount-VHD is not
recognized as the name of a cmdlet“, occur then you need to add a feature to
your server is named “Hyper-V Module for Windows PowerShell”.
Conclusion
We have explained all the possible manual ways to auto-mount VHD in Windows 10 and auto-mount VHD in Windows 7 as well as for all other versions also. This method works successfully but if suddenly the VHD file gets corrupted due for any reason. Then you cannot able to unmount it, first, you have to recover the VHD file. Therefore, VHD Recovery Software helps in this situation to recover data from corrupted VHD files.